Cinema Display Retina/HiDPI Mode
How to Force HiDPI on a Cinema Display
How do you simulate a retina display on a 27" Cinema Display? The main tool used to accomplish this SwitchResX. This will allow for custom resolutions and enabling HiDPI for those resolutions. I'm using a MacBook Pro (Retina, 15-inch, Mid 2014) model with the Intel Iris Pro 1536 MB for reference.
A current (2015) 27"cinema display's resolution is 2560 × 1600 which is a 16:10 ratio. At first look you might be tempted to use SwitchResX's recommended 1280 x 800 resolution to achieve the "truest" HiDPI effect but I think there is a better option that doesn't sacrifice half the screen real estate and leave you with black bars on both sides of your monitor.
Why does this option result in black bars? There is an issue in switching the resolution to 1280 x 800 in SwitchResX that doesn't allow for a perfect halving of the screen resolution. So when selecting 1280 x 800 it's actually using 1280 x 720 which results in bars on both sides of the screen. It appears that the problem is actually within OS X as the author of SwitchResX indicates there's nothing that can currently resolve this issue. A current workaround is to create a custom resolution that is 2 pixels wider than the cinema display: 2562 x 1440 (scaled). After saving this setting and restarting an option of 1280 x 721 with HiDPI is available. However I would argue that a 720p HiDPI should only be used when absolutely necessary because the amount of screen real estate sacrificed is too great.
My main goal with enabling HiDPI is to have OS X look a little easier on my eyes as I have the Cinema Display about 2 feet away from me and my eyes certainly aren't getting any better. I wish mainly to no longer squint at my screen and I found HiDPI mode on my Retina MacBook Pro to be very helpful. So after being dissatisfied with 1280 x 721 cutting my available usable desktop in half I thought I would try some other custom settings. I knew my goal wasn't "pure" retina halving of resolution but just the use of HiDPI mode like when selecting a scaled resolution for the Retina Macbook Pro.
My recommended HiDPI resolution is 1920 x 1080. To achieve this resolution first open SwitchResX Preference Pane from System Preference after installation. Select the Thunderbolt Display in the left pane and then select the Custom Resolutions tab. From here, created a new option with the "+" button and choose "Scaled resolution"from the drop down. Fill in the Horizontal "Scale to" box with 3840 and the Vertical with 2160. You'll notice these values are exactly double 1920 and 1080 respectively. From here close this window by clicking the OK button and save your settings from the File menu and clicking Save Settings. (This program will prompt you to save your settings if you close the window as well.) From here restart your computer and the option will be available under Current Resolutions for the selected Thunderbolt Display as "1920 x 1080 HiDPI." All of the HiDPI options are at the bottom of the list.
Another option for those wanting a little bit larger user interface is 1600 x 900. Just enter 3200 x 1800 on the Custom Resolutions tab for the Thunderbolt display and restart to enable this resolution.
Some custom scaling resolution may result in display performance dipping but I have not noticed anything of the sort using 1920 x 1080 with HiDPI enabled.
Thanks to the creator of SwitchResX, Stéphane Madrau. If you like their software please support them by purchasing a license.
Update: If you're updating to El Capitan, you need to temporarily disable SIP to modify these files and there's a chance the preference list need to be deleted if your custom resolution isn't saving.
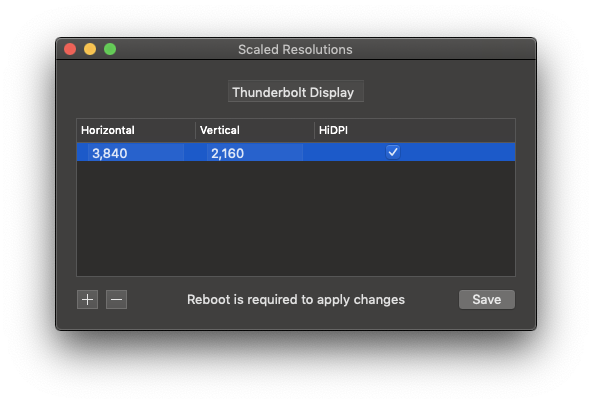
Update 18-11-03: Since macOS Mojave, I've had success with this fork of RDM. I've completely uninstalled SwitchResX as part of this solution. SIP is still required to be disabled to save custom resolutions, and just like my previous instructions, my custom resolution is 3840x2160 with HiDPI enabled. A restart is required to have new setting appears. I've confirmed this works on a MacBook Pro (15-inch, 2017) equipped with a Radeon Pro 560 4096 MB and an Intel HD Graphics 630 1536 MB running macOS Mojave 10.14.1.

Update 2019-10-10: Still working in macOS Catalina.
Update 2020-09-30: Using this exact reference (in case this is unavailable I've forked it as well), this continues to work with macOS Catalina 10.15.7, having compiled it from source myself, disabling SIP is not necessary. I did find that a restart is necessary to get custom resolutions to show
Ruby Forest Druid.